前言
本文在前一篇基础上,写一个使用 zlib 的压缩壳案例。
0x01 zlib 解压
1.1 概述
关于 zlib 的用法找了这些参考资料:
尝试了 zlib、lzo、Windows Compression API,对压缩和解压 API 的基本模式的基本认识大概是这样:
- 首先,你得有被压缩数据的大小(要么分块压缩,要么有整个压缩后的大小)
- 然后得有解压后的预期大小,这个能通过 尝试解压 的操作来实现。比如 Windows Compression API 和 lzo 都可以在解压 buffer 传 NULL,尝试取得解压后的大小,再分配好内存解压。
- zlib 这样的流式压缩、解压处理文件比较友好,但全程在内存里进行的话,流式解压就会导致大量内存分配 =。= 除非一开始就分配足够的空间,不然一个一个内存块申请和合并会很蛋疼。
1.2 内存布局
压缩后的 .packed 节在头部留出 8 个字节,分别保存压缩后大小和压缩前大小,以便一次分配好内存完成解压。
| 偏移 | 大小 | 内容 |
|---|---|---|
| 0 | DWORD | 小端序,压缩后大小 |
| 4 | DWORD | 小端序,压缩前大小 |
| 8 | 可变 | 压缩后的数据 |
1.3 解压代码
解压过程在加载 PE 之前,找到 .packed 节后,开始读取头部大小,并调用解压代码。
if (packed != NULL) {
    DWORD compressed_size = *((DWORD *)packed);         // compressed size little-endian
    DWORD decompressed_size = *((DWORD *)(packed + 4)); // decompressed size little-endian
    void *compressed = (void *)(packed + 8);            // compressed buffer
    void *decompressed = malloc(decompressed_size);     // decompressed buffer
    if (decompressed == NULL) {
        MessageBoxA(NULL, "memory allocate failed", "malloc", MB_OK);
        return 0;
    }

    decompress(compressed, compressed_size, decompressed, decompressed_size);

    void (*entrypoint)(void) = (void (*)(void))load_PE(decompressed);
    entrypoint();

    return 0;
}
应该没有太多疑问。接下来的是解压代码。
void decompress(void *compressed, size_t length, void *decompressed, size_t decompressed_length) {
  z_stream inflate_stream;
  inflate_stream.zalloc = Z_NULL;
  inflate_stream.zfree = Z_NULL;
  inflate_stream.opaque = Z_NULL;
  inflate_stream.avail_in = (uInt)length;
  inflate_stream.next_in = (Bytef *)compressed;
  inflate_stream.avail_out = (uInt)decompressed_length;
  inflate_stream.next_out = (Bytef *)decompressed;
  inflateInit(&inflate_stream);

  int err = inflate(&inflate_stream, Z_NO_FLUSH);
  if (err != Z_STREAM_END) {
    inflateEnd(&inflate_stream);
    MessageBoxA(NULL, "zlib decompression failed", "zlib", MB_OK);
    return;
  }
  inflateEnd(&inflate_stream);
  return;
}
定义 inflate 流:
avail_in是可用的输入 buffer 大小avail_out是可用的输出 buffer 大小next_in是输入 buffer 的指针next_out是输出 buffer 的指针zalloc、zfree、opaque初始化成 NULL
使用 inflateInit() 初始化流,然后调用 inflate() 解压。inflate() 会返回错误码,如果长度正好,会返回 Z_STREAM_END。如果输出 buffer 长度不足,但解压成功,会返回 Z_OK。其他情况会返回错误码。因为这里很清楚给定的压缩前长度,解压必定返回 Z_STREAM_END,其他情况都有问题,所以只做了一个判断。
对于其他情况,错误码可以用 zError 获取错误描述。
解压结束后要使用 inflateEnd() 关闭流。
0x02 zlib压缩
因为使用 python 写加壳机,就不用这么麻烦了。
在处理 .packed 节的时候,使用 struct 和 zlib 两个 python 自带的库就能完成压缩和填充头。
在脚本头部添加两句 import
import struct
import zlib
然后修改加壳代码中,添加 .packed 节的代码。
# add packed section
with open('example.exe', 'rb') as f:
    file_content = f.read()
    origin_length = len(file_content)
    compressed = zlib.compress(file_content, 9)
    compressed_length = len(compressed)
    section_content = struct.pack('<II', compressed_length, origin_length)
    section_content += compressed

    packed_section = lief.PE.Section('.packed')
    packed_section.content = list(section_content)
    packed_section.characteristics = (lief.PE.SECTION_CHARACTERISTICS.MEM_READ |
                                      lief.PE.SECTION_CHARACTERISTICS.CNT_INITIALIZED_DATA)
    output.add_section(packed_section)
可以看到使用 zlib.compress 就完成了压缩,不用原始 zlib 流那么麻烦。
struct.pack 指定了小端序,两个4字节int,分别填写压缩后大小和原始大小,连接压缩后的数据,填充进.packed 节。
就这样,压缩功能成功完成。
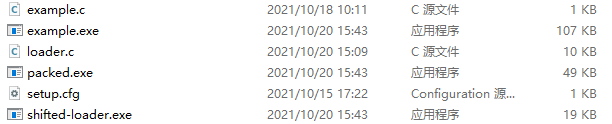
0x03 成果展示
总结
偷懒了,用了一些 msvcrt 的函数,比如 malloc,要加个 -lmsvcrt 链接选项。最终成品压缩率还可以,从107KB 压缩到了 49KB,zlib 不负期望。
写好壳程序之后,不管是加密还是压缩都是很容易的事情(指单纯做个简单实现),但问题依然存在:
- 64位程序——我觉得可以以后再说吧?我连64位汇编都还不会(泪)。
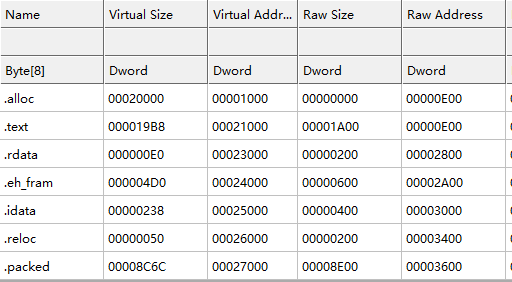
- 脱壳跟玩一样——现在看 .packed 已经没有 MZ 这个摆明了是原始程序的标志了,但并没有卵用。壳程序也没混淆和反调试,节表也是清晰可见,根本不用分析。
下一篇还没想好做什么,得先继续学习充实下自己,找个方向。