前言
距离上一篇加壳原理已经过去挺久了,这段时间稍微折腾了一下 nasm,尝试手工制作了 PE32 文件,积累了一些基本的知识吧。
所以现在继续学习加壳——如何对不支持 ASLR 的 PE32 程序进行加壳?
0x01 关于ASLR
ASLR是一项内存保护技术,用于防范内存损坏漏洞,比如缓冲区溢出。需要注意的是 ASLR 并不是 解决 了相关威胁,而是让利用相关的漏洞变得更加困难和具有挑战性。
ASLR 的全名是 Address Space Layout Randomization ,地址空间布局随机化技术。一个典型的 PE32 程序在没有 ASLR 支持的情况下, 地址空间布局是确定的:程序镜像总会加载到固定的地址。这个地址会在文件头里指定。攻击者可以利用这一特点来构造恶意数据,让存在内存损坏漏洞的程序按攻击者意图跳过或执行特定逻辑,造成安全威胁。
对应 ASLR 的地址空间布局随机化,程序需要再次编译来支持重定位 Relocation ,别无他法(大概)。
0x02 思路
对于加壳一个没有重定位,不支持 ASLR 的 PE32 程序,假设这个程序的基址是 0x04000000,原先的 VirtualAlloc 方式分配内存是行不通的。加壳后程序若开启 ASLR,则 0x04000000 可能已经存在其他模块,并不能保证这个基址可用。所以加壳后的程序必须也使用 0x04000000 这个基址,而且标记为不支持 ASLR,避免基址已经被其他模块使用造成加载器无法工作。
将加壳后程序的基址设置为固定的 0x04000000 又会产生新的问题:加载器的代码段不能放在 0x04000000 ,否则加载器运行时就会出现被被加载的代码覆盖的情况,导致程序跑飞。所以编译后的加载器所有 Section 都必须有一定的偏移,这个偏移值就是被加载程序的 Section 大小之和(对齐后)。而因此多出来的空间单独分成一个 Section ,正好用来放要加载的程序。
另外,还必须确认文件头大小是否一致,因为我们需要将被加载程序的文件头覆盖加载器的文件头。而最开始预留的空间必须分配为一个 Section,让 Windows 的加载器能顺利加载程序而不报“不是有效的Win32程序”错误。
内存布局示意图如下:

所以加载器的加载步骤如下:
- 寻找被加载的 Section 。
- 复制文件头覆盖自己的文件头。
- 以自己的基址为被加载程序的基址,完成加载。
加壳机的加壳步骤如下:
- 解析被加壳程序,获取 Section 大小、文件头大小、对齐大小等信息。
- 生成加载器程序,根据上一步取得的数据计算出加载器 Section 的偏移和对齐。
- 合并被加壳程序和加载器,生成被加壳程序。
案例程序如下:
#include <Windows.h>

int main(void) {
  MessageBoxA(NULL, "Hello world!", "MSGBOX", MB_OK);
  return 0;
}
0x03 加载器修改
加载器需要把 VirtualAlloc 改成 GetModuleHandleA,并解除当前程序文件头的写保护,并在随后的复制 Section 阶段同样用 VirtualProtect 解除写保护,添加执行权限。
void *load_PE(char *PE_data) {
  IMAGE_DOS_HEADER *p_DOS_header = (IMAGE_DOS_HEADER *)PE_data;
  IMAGE_NT_HEADERS *p_NT_headers = (IMAGE_NT_HEADERS *)(PE_data + p_DOS_header->e_lfanew);

  // extract information from PE header
  DWORD size_of_image = p_NT_headers->OptionalHeader.SizeOfImage;
  DWORD entry_point_RVA = p_NT_headers->OptionalHeader.AddressOfEntryPoint;
  DWORD size_of_headers = p_NT_headers->OptionalHeader.SizeOfHeaders;

  // base address
  char *p_image_base = (char *)GetModuleHandleA(NULL);
  if (p_image_base == NULL) {
    return NULL;
  }

  // make sure we can write in allocated memory
  DWORD oldProtect;
  VirtualProtect(p_image_base, p_NT_headers->OptionalHeader.SizeOfHeaders, PAGE_READWRITE, &oldProtect);

  // copy PE headers in memory
  mymemcpy(p_image_base, PE_data, size_of_headers);

  // Section headers starts right after the IMAGE_NT_HEADERS struct, so we do some pointer arithmetic-fu here.
  IMAGE_SECTION_HEADER *sections = (IMAGE_SECTION_HEADER *)(p_NT_headers + 1);

  for (int i = 0; i < p_NT_headers->FileHeader.NumberOfSections; i++) {
    // calculate the VA we need to copy the content, from the RVA
    // section[i].VirtualAddress is a RVA, mind it
    char *dest = p_image_base + sections[i].VirtualAddress;

    // check if there is Raw data to copy
    if (sections[i].SizeOfRawData > 0) {
      // make sure we can write in allocated sections
      VirtualProtect(dest, sections[i].SizeOfRawData, PAGE_READWRITE, &old_protect);
      // We copy SizeOfRaw data bytes, from the offset PointerToRawData in the file
      mymemcpy(dest, PE_data + sections[i].PointerToRawData, sections[i].SizeOfRawData);
    } else {
      VirtualProtect(dest, sections[i].Misc.VirtualSize, PAGE_READWRITE, &old_protect);
      for (size_t i = 0; i < sections[i].Misc.VirtualSize; i++) {
        dest[i] = 0;
      }
    }
  }

    // ...
}
此外还有一个坑:不知道为啥,我用 lief python 生成的 DataDirectories 实际只有15个元素(包括最后一个 null 元素),但 winnt.h 里定义的 DataDirectories 是固定长度 16 个元素,所以直接算 p_NT_header + 1 得到的偏移值会比预期的大 8 个字节,导致报找不到 .packed 。
改成这样。
int _start(void) {
  char *unpacker_VA = (char *)GetModuleHandleA(NULL);

  IMAGE_DOS_HEADER *p_DOS_header = (PIMAGE_DOS_HEADER)unpacker_VA;
  IMAGE_NT_HEADERS *p_NT_headers = (PIMAGE_NT_HEADERS)(unpacker_VA + p_DOS_header->e_lfanew);
  IMAGE_SECTION_HEADER *sections = (PIMAGE_SECTION_HEADER)(p_NT_headers + 1);
  // 注意看这里再计算了一次偏移
  sections = (PIMAGE_SECTION_HEADER)((char *)sections - (IMAGE_NUMBEROF_DIRECTORY_ENTRIES -
                                                         p_NT_headers->OptionalHeader.NumberOfRvaAndSizes) *
                                                            sizeof(IMAGE_DATA_DIRECTORY));
0x04 加壳器
加壳器这次用 python 写,MinGW 下又要重新编译 LIEF 太折磨人了。
4.1 工具函数
先是导入和定义必要的工具。
import lief

def align(x, al):
    """ return <x> aligned to <al> """
    return ((x+(al-1))//al)*al
4.2 解析
先分析案例程序,获得必要的数据。
binary = lief.PE.parse('example.exe')

# calculate shift offset and reserved section size
image_base = binary.optional_header.imagebase
lowest_rva = min([s.virtual_address for s in binary.sections])
highest_rva = max([s.virtual_address + s.size for s in binary.sections])
sect_alignment = binary.optional_header.section_alignment
print('[+] analyze origin demo program binary success.')
取得基址、所有 section 中最低的起始 rva 和最高的结束 rva,得到整个 PE 镜像的 Sections 覆盖的内存范围。
4.3 构造加载器
使用 MinGW 来完成加载器构造——当然有其他更好的做法,加壳还要装一个 MinGW 未免太麻烦,但我也不知道该怎么做就是了(我猜的话,大概拿 nasm 应该就刑。)
编译命令在 Python 脚本里生成并执行。
# compile shifted loader program
compile_args = [
    'loader.c',
    '-m32',
    '-O2',
    '-Wall',
    '-Wl,--entry=__start',
    '-nodefaultlibs',
    '-nostartfiles',
    '-lkernel32',
    '-luser32',
    f'-Wl,--image-base={hex(image_base)}',
    f'-Wl,--section-start=.text={hex(align(image_base+highest_rva,sect_alignment))}',
    '-o',
    'shifted-loader.exe'
]

try:
    check_output(' '.join(['gcc', *compile_args]), shell=True, stderr=STDOUT)
    print('[+] compile shifted loader program success.')
except CalledProcessError as e:
    print(f'[!] loader compilation failed, {e.stdout.decode()}')
    raise

shifted_loader = lief.PE.parse('shifted-loader.exe')
sect_alignment = shifted_loader.optional_header.section_alignment
file_alignment = shifted_loader.optional_header.file_alignment
-luser32 是因为我添加了一个 MessageBoxA 的调用。
-Wl,--image-base=... 设置了加载器的基址,确保加载器和被加壳的程序落在同一个基址上。
-Wl,--section-start=... 因为知道第一个 section 一定是 .text 所以只设置了第一个 section 的地址,之后的 section 会自动往后挪。
其他参数不多解释了。
编译完成后,再解析出加载器的对齐信息,准备用于构造完整的被加壳程序。
4.4 构造加壳程序
加载器和被加载的程序都已经就绪,接下来就是把加载器和程序合并成加壳后的程序了。这一步还是先在创建 lief 的PE32 对象,然后填充基址、Section 对齐、文件对齐,并且把 DLL Characteristics 重置到 0,目的是声明不支持 ASLR。
# create new binary from scratch
output = lief.PE.Binary('packed', lief.PE.PE_TYPE.PE32)

# copy essential fields from shifted_loader
output.optional_header.imagebase = shifted_loader.optional_header.imagebase
output.optional_header.section_alignment = shifted_loader.optional_header.section_alignment
output.optional_header.file_alignment = shifted_loader.optional_header.file_alignment

# disable ASLR
output.optional_header.dll_characteristics = 0
先准备这些文件头字段,接下来开始填充 Section ,最先填充的就是准备用作被加载程序内存空间的 .alloc 节。
# add .alloc section
allocate_size = align(highest_rva-lowest_rva, sect_alignment)
allocate_section = lief.PE.Section(".alloc")
allocate_section.virtual_address = lowest_rva
allocate_section.virtual_size = allocate_size
allocate_section.characteristics = (lief.PE.SECTION_CHARACTERISTICS.MEM_READ
                                    | lief.PE.SECTION_CHARACTERISTICS.MEM_WRITE
                                    | lief.PE.SECTION_CHARACTERISTICS.CNT_UNINITIALIZED_DATA)
output.add_section(allocate_section)
将 .alloc 节起始点放置在低位,长度为被加载程序的节大小之和对齐。
之后开始复制加载器的节。
# copy sections
for s in shifted_loader.sections:
    # let lief recalculate section offset and sizeof raw data
    s.offset = 0
    s.sizeof_raw_data = 0
    output.add_section(s)
需要注意 把 offset 和 sizeof_raw_data 置零,让 lief 去计算偏移和大小,后面添加的一应节都按这样操作。新创建的 Section 还好,对于从加载器里复制的 Section,保留 offset 和 sizeof_raw_data 会导致最终成品的 Section 数据不正确,造成 ntdll 里加载PE文件时,读取PE数据结构时出错。可以自行用 x32dbg 验证。
最后把被加载的文件打包进去。
# add packed section
with open('example.exe', 'rb') as f:
    packed_section = lief.PE.Section('.packed')
    packed_section.content = list(f.read())
    packed_section.characteristics = (lief.PE.SECTION_CHARACTERISTICS.MEM_READ |
                                      lief.PE.SECTION_CHARACTERISTICS.CNT_INITIALIZED_DATA)
    output.add_section(packed_section)
同样,让 lief 去计算偏移和大小。复制好节,继续复制 Data Directories,这又有一个坑。
# copy data directories
for i in range(0, 15):
    src = shifted_loader.data_directories[i]
    output.data_directories[i].rva = src.rva
    output.data_directories[i].size = src.size

# correct number of data directories
# warning: size of data directories may disagree with IMAGE_NT_HEADERS.DataDirectory in winnt.h
output.optional_header.numberof_rva_and_size = len(output.data_directories)
需要注意到,lief 的数据结构里,允许的 data_directories 只有 15 个!但 winnt.h 里定义的 DATA_DIRECTORIES 数组,是固定16个元素!
如果直接 range(16) 去遍历,会出现 IndexError ,如果忽视这个长度问题,直接在加载器里采用 Windows SDK 的头文件定义的结构,会导致取节表指针的时候比预期的多偏移 8 个字节,造成问题。调试起来简直太折磨人了。
之后再复制入口点和镜像大小。
# copy original address of entrypoint
output.optional_header.addressof_entrypoint = shifted_loader.optional_header.addressof_entrypoint
# let lief recalculate size of image
output.optional_header.sizeof_image = 0
注意,入口点和镜像大小的字段必须在复制完 Section 之后再复制,不然 lief 会犯傻,原因不明,有兴趣可以自己改一改顺序看看结果。
到这里,基本准备就绪,就可以把构造好的可执行文件写入硬盘了。
# build output binary
builder = lief.PE.Builder(output)
builder.build()
builder.write('packed.exe')
4.5 完整代码
# %%
import lief
from subprocess import STDOUT, CalledProcessError, check_output


def align(x, al):
    """ return <x> aligned to <al> """
    return ((x+(al-1))//al)*al


# %%
# compile origin demo program
try:
    check_output('gcc example.c -m32 -O2 -o example.exe', shell=True, stderr=STDOUT)
except CalledProcessError as e:
    print(f'[!] demo program compilation failed, {e.stdout.decode()}')
    raise

binary = lief.PE.parse('example.exe')
print('[+] compile origin demo program success.')

# %%
# calculate shift offset and reserved section size
image_base = binary.optional_header.imagebase
lowest_rva = min([s.virtual_address for s in binary.sections])
highest_rva = max([s.virtual_address + s.size for s in binary.sections])
sect_alignment = binary.optional_header.section_alignment
print('[+] analyze origin demo program binary success.')

# %%
# compile shifted loader program
compile_args = [
    'loader.c',
    '-m32',
    '-O2',
    '-Wall',
    '-Wl,--entry=__start',
    '-nodefaultlibs',
    '-nostartfiles',
    '-lkernel32',
    '-luser32',
    f'-Wl,--image-base={hex(image_base)}',
    f'-Wl,--section-start=.text={hex(align(image_base+highest_rva,sect_alignment))}',
    '-o',
    'shifted-loader.exe'
]

try:
    check_output(' '.join(['gcc', *compile_args]), shell=True, stderr=STDOUT)
    print('[+] compile shifted loader program success.')
except CalledProcessError as e:
    print(f'[!] loader compilation failed, {e.stdout.decode()}')
    raise

shifted_loader = lief.PE.parse('shifted-loader.exe')
sect_alignment = shifted_loader.optional_header.section_alignment
file_alignment = shifted_loader.optional_header.file_alignment

# %%
# create new binary from scratch
output = lief.PE.Binary('packed', lief.PE.PE_TYPE.PE32)

# copy essential fields from shifted_loader
output.optional_header.imagebase = shifted_loader.optional_header.imagebase
output.optional_header.section_alignment = shifted_loader.optional_header.section_alignment
output.optional_header.file_alignment = shifted_loader.optional_header.file_alignment

# disable ASLR
output.optional_header.dll_characteristics = 0

# add .alloc section
allocate_size = align(highest_rva-lowest_rva, sect_alignment)
allocate_section = lief.PE.Section(".alloc")
allocate_section.virtual_address = lowest_rva
allocate_section.virtual_size = allocate_size
allocate_section.characteristics = (lief.PE.SECTION_CHARACTERISTICS.MEM_READ
                                    | lief.PE.SECTION_CHARACTERISTICS.MEM_WRITE
                                    | lief.PE.SECTION_CHARACTERISTICS.CNT_UNINITIALIZED_DATA)
output.add_section(allocate_section)

# copy sections
for s in shifted_loader.sections:
    # let lief recalculate section offset and sizeof raw data
    s.offset = 0
    s.sizeof_raw_data = 0
    output.add_section(s)

# add packed section
with open('example.exe', 'rb') as f:
    packed_section = lief.PE.Section('.packed')
    packed_section.content = list(f.read())
    packed_section.characteristics = (lief.PE.SECTION_CHARACTERISTICS.MEM_READ |
                                      lief.PE.SECTION_CHARACTERISTICS.CNT_INITIALIZED_DATA)
    output.add_section(packed_section)

# copy data directories
for i in range(0, 15):
    src = shifted_loader.data_directories[i]
    output.data_directories[i].rva = src.rva
    output.data_directories[i].size = src.size

# correct number of data directories
# warning: size of data directories may disagree with IMAGE_NT_HEADERS.DataDirectory in winnt.h
output.optional_header.numberof_rva_and_size = len(output.data_directories)
# copy original address of entrypoint
output.optional_header.addressof_entrypoint = shifted_loader.optional_header.addressof_entrypoint
# let lief recalculate size of image
output.optional_header.sizeof_image = 0

# build output binary
builder = lief.PE.Builder(output)
builder.build()
builder.write('packed.exe')
print('[+] create packed binary success.')
只放一下加载器代码,一共三个代码文件托管在 Gist 上,需要安装 MinGW 和 LIEF,配置方式不赘述。还不会 C 和 Python 的话建议学一下先呢。
0x05 成果
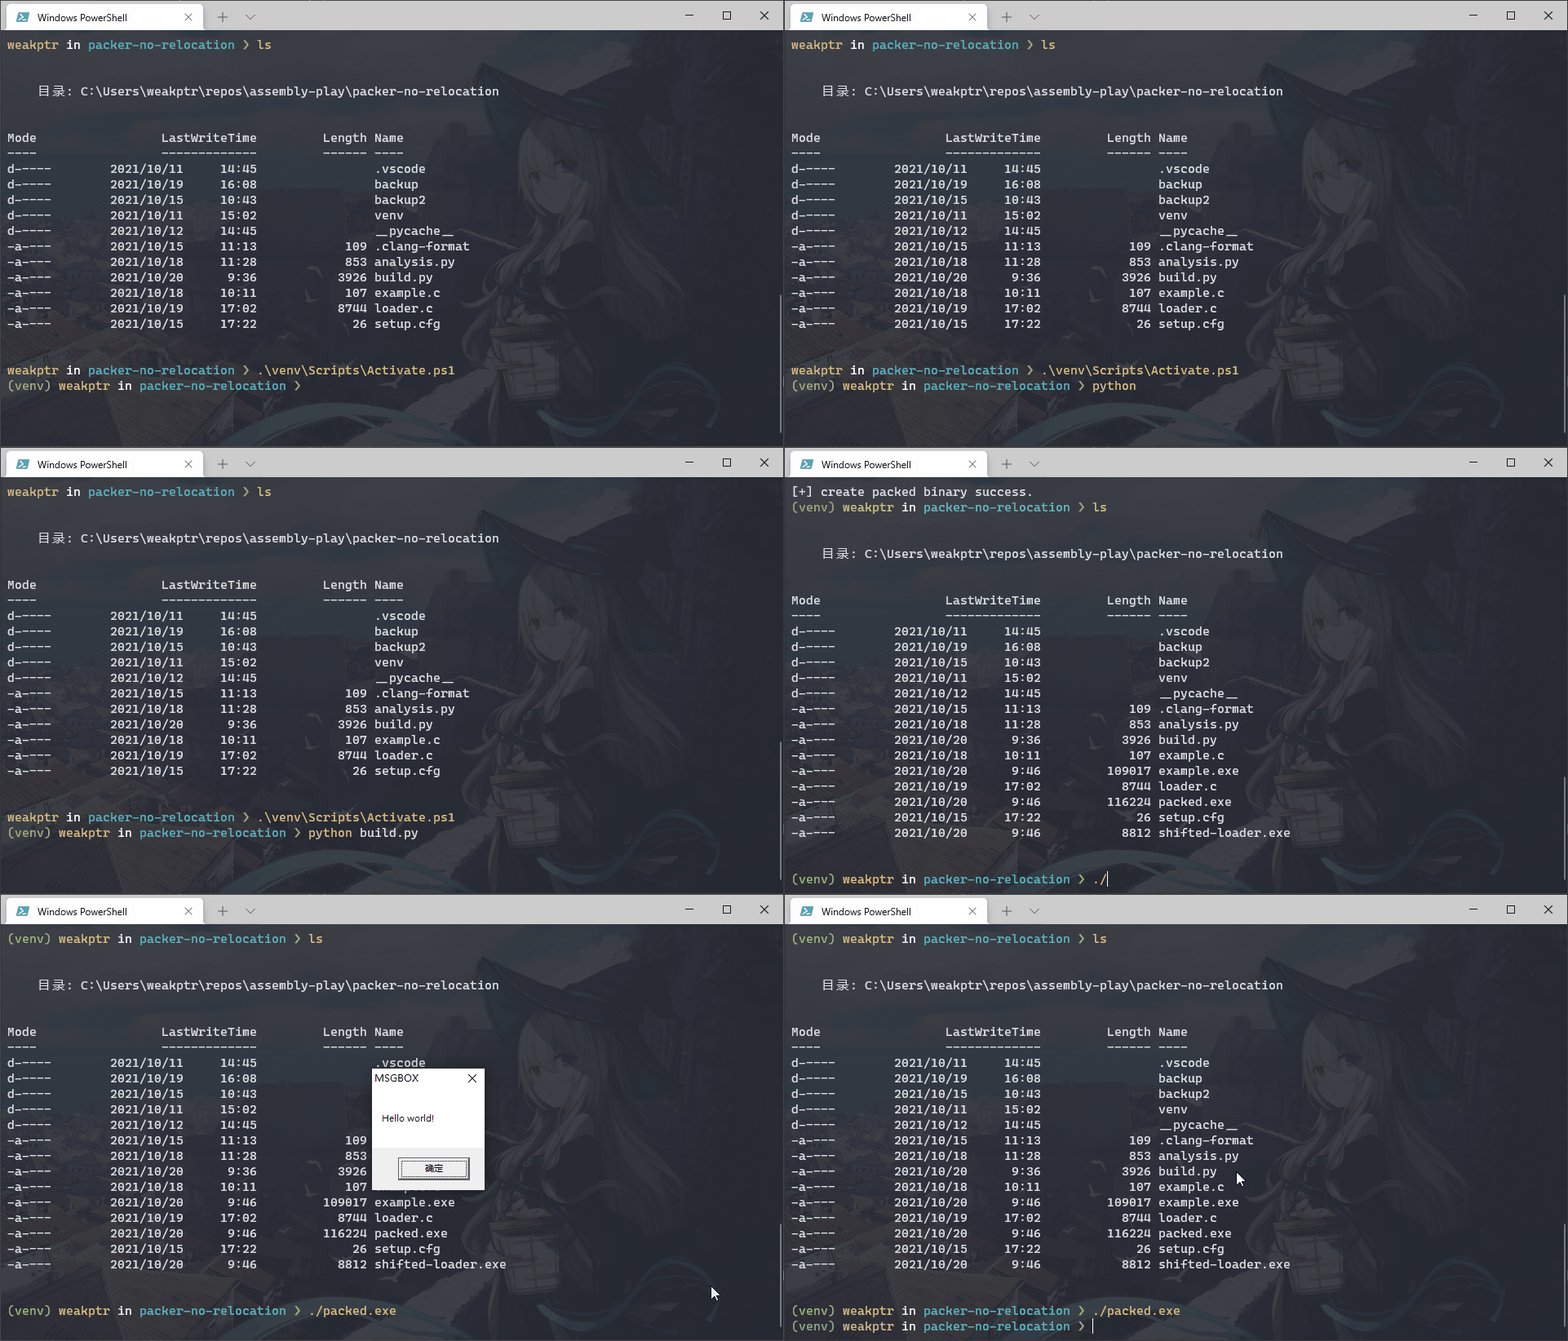
加壳机运行效果。

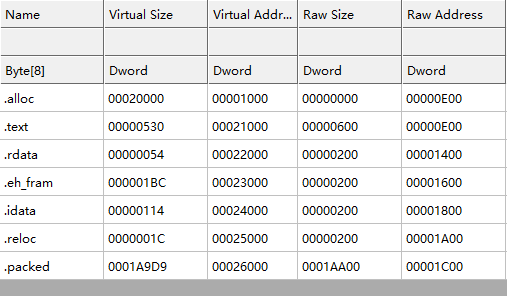
packed.exe 的节表信息如下。

结论
整个过程里踩了不少坑,几乎都要靠 x32dbg 调试和 CFF Explorer 挨个文件头字段检查。有个比较实用的做法是拿 LIEF 解析好加壳后的文件,把输出结果和原始加载器对比。
import lief

packed = lief.PE.parse('packed.exe')
loader = lief.PE.parse('shifted-loader.exe')

with open('packed-analysis.txt', 'w+', encoding='utf-8') as out:
    print('-----'*20, file=out)
    print('packed.exe', file=out)
    print('-----'*20, file=out)
    print(packed.header, file=out)
    print(packed.optional_header, file=out)

    for entry in packed.data_directories:
        print(entry, file=out)

    for s in packed.sections:
        print(s, file=out)

with open('loader-analysis.txt', 'w+', encoding='utf-8') as out:
    print('-----'*20, file=out)
    print('shifted-loader.exe', file=out)
    print('-----'*20, file=out)
    print(loader.header, file=out)
    print(loader.optional_header, file=out)

    for entry in loader.data_directories:
        print(entry, file=out)

    for s in loader.sections:
        print(s, file=out)
分析好之后就可以拿 vscode 去比较了。
code -n -d packed-analysis.txt loader-analysis.txt
比起直接拿 CFF Explorer 硬看字段哪儿不对,和编译器产生的正常文件比较能排除掉一些无关的字段。但也不是万能,比如说之前没有写 section.offset=0,结果生成的 PE32 文件导入表内容坏了,一直没意识到。直到 x32dbg 调试中发现 ntdll 里加载导入表时碰到了一个无效地址(我怎么知道是加载导入表时呢,胆大心细加上99%的运气...),然后看 CFF Explorer 才发现导入表完全挂了,再回头看节表才发现 .idata 的偏移和大小都是坏的...
还有 data directories 的坑,也是靠 x32dbg,跳转到内存,才发现 (IMAGE_SECTION_HEADER*)(PIMAGE_NT_HEADERS+1) 算出来的偏移值多了8字节,冥思苦想这8字节怎么回事,胡乱分析,然后突然意识到 data directory 正好 8 字节,加壳机里又有个很迷惑的 range(0,15),反复确认了几次才发现真的是 LIEF 就给了 15 个 Data directory —— 但 Windows SDK 里 winnt.h 定义的是 固定 16 个元素 ,之后去翻 PE Format 文档才发现微软早就挖好了这个坑等你翻文档:
Note that the number of directories is not fixed. Before looking for a specific directory, check the NumberOfRvaAndSizes field in the optional header.
原先的文章预计是要做一个压缩壳,简单试验了一下没啥难度,代码都不用几行(VS+CMake+VCPKG 同时用 LIEF 和 ZLIB/LZO 什么的有点费劲,所以用 Windows Compression API),就这样水一篇文章有点不好意思。所以就先去看怎么对付不能重定位的PE32了,结果搞 LIEF 的各种环境编译、折腾VC++的Pragma、翻 Linker Script 手册看能不能改节表偏移、学NASM、从国庆坑到现在。
本篇的参考文章是:https://bidouillesecurity.com/tutorial-writing-a-pe-packer-part-4/
文中有些地方比较怪,比如说先编译了正常 loader 再编译 shifted_loader 就让人不是很理解,照抄抄出一堆bug。所以本文的脚本和参考的脚本已经有点对不上了。
受制于不知道怎么编译出没有重定位的程序,我拿一个有重定位的做了实验(理论上来说,应该是一样的吧?),所以到头也不确定是不是真的能把没有重定位的程序跑起来。
就这样吧,这个结论有点长。到这就差不多了。